How to Install a Fence

Before you touch a shovel, do two things: call 811 for utility locates, and confirm exactly where your property line is. Those two calls prevent the only two fence mistakes that cannot be fixed with more lumber, hitting a buried gas line and building on your neighbor's land.
After that, how to install a fence comes down to four repeatable steps: string a line and mark post positions, dig holes to one third of the post length or below the frost line (whichever is deeper), set and plumb the posts, then hang rails and pickets. The posts are the entire fence. Everything above ground is trim.
Get your post, rail, and picket counts first. Our free fence calculator turns your run length and fence height into post count, rail count, picket count, and concrete bags.
Updated August 2026
A note on numbers. This page gives you dimensions, quantities and scope, not dollar figures. Material and contractor pricing varies by region, by season and by the specifics of your job, and we do not set any of it. Work out what you need here, then get quotes that can be compared to each other.
Before you dig: 811, property lines, and permission
Call 811, every time, no exceptions
811 is the national "call before you dig" number. You call it or file online at 811.com, describe where you're digging, and utility companies send locators out to mark their buried lines with paint and flags.
- It's free.
- It's legally required in most states before any excavation, including hand digging in many jurisdictions.
- Give notice ahead of time. Most states require two to three business days' notice, so call the week before, not the morning of.
- Mark your dig area in white paint or white flags before you call. It helps locators mark only what matters.
- Locates expire. Tickets are typically good for a set number of days. If the job drags, renew.
- Hand dig inside the tolerance zone. Within roughly 18 to 24 inches on each side of a mark, use a shovel, not a powered auger. Locate marks show approximate horizontal position, not exact depth or exact centerline.
The color code is standardized:
| Color | Utility |
|---|---|
| Red | Electric power |
| Yellow | Gas, oil, steam, petroleum |
| Orange | Communications, cable TV, fiber |
| Blue | Potable water |
| Purple | Reclaimed water, irrigation, slurry |
| Green | Sewer and drain |
| White | Proposed excavation, marked by you |
| Pink | Temporary survey markings |
One important gap: 811 marks public utility lines up to the meter. It does not mark private lines on your property. Your gas line to a detached garage, your septic field, your irrigation, your invisible dog fence, and the electric run to a shed are all yours to locate. If you don't know where they are, hand dig.
Hitting a fiber line is expensive and embarrassing. Hitting a gas line with a powered auger is life-threatening. This is a genuinely free step that removes a real risk, so there is no version of this project where skipping it makes sense.
Property lines, setbacks, and the neighbor conversation
Fences get moved more often for legal reasons than physical ones. Sort this out on paper first.
Find the actual line. Survey pins are iron rods, usually 6 to 24 inches below grade at the property corners, and a metal detector will find them. A fence built on a guess can end up on the wrong side of a line, and in some states a fence that sits over the line long enough creates a boundary dispute you did not want.
If the pins are missing or the line is contested, hire a boundary survey. A surveyor charges by lot size, terrain, and how much records research the parcel needs, and whatever they quote is cheap compared with moving 150 feet of finished fence after a neighbor objects.
Check the setback. Many municipalities require a fence to sit a set distance inside the property line, often somewhere between a few inches and a few feet, and front yard fences frequently have separate, stricter rules on height and on how close to the sidewalk they can sit. Corner lots often have a sight triangle rule that limits fence height near the intersection.
Check the height limit. Six feet is the common maximum for a rear yard privacy fence and four feet is common in front yards, but this is entirely local.
Check the HOA. Many associations restrict material, color, height, and style, and some require the finished side to face out. Getting HOA approval before you buy is far easier than after.
Check whether you need a permit. Plenty of jurisdictions require one for a fence over a certain height. Fees are typically modest.
Talk to the neighbor. Not legally required in most places, but it costs nothing and it prevents the version of this project where someone calls the county on day two. If they want to split the cost, get the agreement in writing, including who owns and maintains it.
Step 1: layout, post spacing, and stringing a line
Mark the corners. Drive a stake at each corner and each end of the fence, positioned to your setback rather than right on the line.
String a taut line. Run mason's line between the corner stakes at a consistent height, pulled tight. This line is the reference for every post, and a sagging line puts a curve in your fence you'll see from the street forever.
Square your corners. Use the 3-4-5 method: measure 3 feet along one line, 4 feet along the other, and the diagonal between those marks should be exactly 5 feet. Scale it up to 6-8-10 or 9-12-15 for a longer run and better accuracy.
Space the posts. Eight feet on center is the standard for wood privacy fence and matches standard 8-foot rail stock. Six feet on center is stiffer, uses more posts, and is the better choice in high-wind exposure or with heavy 6-foot panels. Preassembled panels dictate their own spacing exactly, and there is no fudging it.
Divide the run evenly. Never leave a 2-foot orphan bay at the end. If a run is 46 feet, don't build five 8-foot bays and a 6-foot bay; build six bays at 7 feet 8 inches. Even spacing looks intentional and irregular spacing looks like a mistake.
Mark each hole center along the string with marking paint, then step back and look down the line before you dig.
How to install a fence post that stays put
Posts are 90 percent of a fence's life expectancy. Everything in this section is worth doing properly.
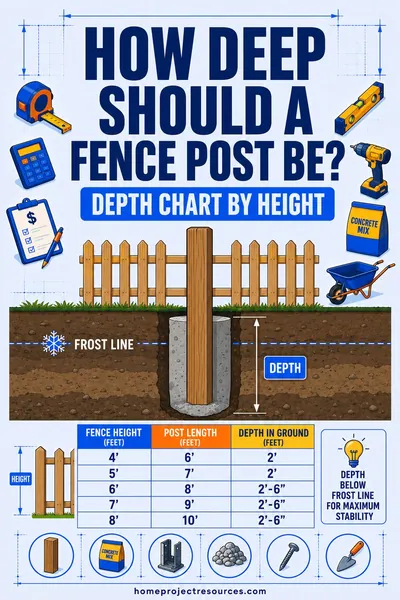
Depth: the one-third rule or the frost line, whichever is deeper
Bury at least one third of the post's total length, or 24 inches, whichever is deeper. For a 6-foot privacy fence, that means a 9-foot post set 36 inches into the ground.
Then check the second rule: the bottom of the hole also has to reach below your local frost line. Whichever rule gives you the deeper hole is the one you follow.
| Fence height | Post length to buy | Hole depth (no frost concern) | Hole diameter (4x4 post) |
|---|---|---|---|
| 3 ft picket | 5 ft | 24 in (minimum governs) | 10 to 12 in |
| 4 ft picket or rail | 6 ft | 24 in | 10 to 12 in |
| 5 ft | 7 ft 6 in (or 8 ft, trim) | 30 in | 10 to 12 in |
| 6 ft privacy | 9 ft | 36 in | 10 to 12 in |
| 8 ft privacy | 12 ft, 6x6 post | 48 in | 14 to 18 in |
| Gate posts, any height | One size up, 6x6 | Add 6 to 12 in to the depth above | 14 to 18 in |
The shortcut everyone takes is buying 8-foot posts for a 6-foot fence, which leaves 24 inches in the ground, or 25 percent instead of 33 percent. Plenty of those fences are still standing in sheltered yards. It's also the fence that goes over in a storm while the neighbor's stays up. Buy 9-footers.
Hole diameter is about three times the post width, so 10 to 12 inches for a 4x4 and 16 to 18 inches for a 6x6. That leaves roughly 3 inches of fill all the way around, which is enough to spread load and enough room to compact without voids. If you have to choose between more depth and more diameter, choose depth.
Frost depth is a local code number, not a weather fact, and it can differ from the county next door. Call your building department for the enforced figure. Fence post depth has the region-by-region table and explains why frost heave lifts a post that isn't deep enough.
Buy ground contact rated posts
Pressure-treated lumber is sold in different preservative retention levels. Above-ground rated material (often tagged UC3B) is for deck boards and rails that shed water. Ground contact rated material (UC4A, or UC4B for critical structural use) carries roughly twice the preservative retention and is what a buried post requires.
The tag stapled to the end of the board tells you which it is. Burying above-ground-rated posts is a common mistake, and the fence looks fine for about six years before posts start snapping off at grade.
Setting method: concrete, gravel, or foam
There is a real case for each of these, and the internet argues about it constantly.
| Method | What each post takes | Holding strength | Drainage | Time to workable | Best for |
|---|---|---|---|---|---|
| Concrete | 3 to 4 bags of 80 lb mix, the priciest of the three per post | Highest | Poor unless you add gravel below | 20 min to 4 hr with fast-setting mix, full cure 7 days | Gate posts, corners, tall fences, sandy or loose soil |
| Gravel only | Crushed stone, the cheapest option in bags and cheaper still by the ton | Good in firm soil, less in sand | Excellent | Immediate | Wood line posts, wet or clay ground, anyone planning to replace posts someday |
| Expanding foam | One two-part cartridge per post, between gravel and concrete on cost | Good, roughly comparable to concrete for residential fence loads | Moderate | 3 to 5 minutes | Long runs done solo, tight access, no water source, cold weather |
Concrete is the strongest and the default for gate posts, corners, tall fences, and loose soil. Mix it wet in a bucket or wheelbarrow for anything carrying real load, since dry-pouring gives a lower and less predictable strength as water distribution through the column is uneven. If you do dry-pour a line post, pour in 6-inch lifts and wet each lift instead of filling the hole and hosing the top.
Gravel is legitimately better than most people expect for wood line posts. Pack 3/4-inch crushed angular stone in 4 to 6 inch lifts, tamping hard between lifts. Water drains straight through instead of sitting against the post, so wood posts set in gravel routinely outlast the same posts set in concrete. It's also vastly easier to pull a post later, turning a two-hour jackhammer job into 20 minutes with a shovel. Use angular crushed stone, never smooth pea gravel, because angular stone locks and round stone rolls.
Expanding foam is a two-part polyurethane in a mixing bag. It's genuinely fine for residential line posts, weighs almost nothing to carry, needs no water, and lets one person set a whole run in an afternoon. It costs more per post than a couple of bags of concrete and it is not repositionable once it kicks, so brace the post plumb before you pour. You get about 60 seconds.
The three details that double post life
1. Gravel in the bottom of every hole, always. Put 4 to 6 inches of crushed angular stone in before the post goes in, regardless of what you're using above it.
Here's the failure mode you're preventing. When concrete runs from grade all the way to the bottom of the hole, it forms a sealed cup. Wood shrinks and concrete doesn't, so a hairline gap opens between them. Water runs down the post, follows that gap, and collects in the bottom of the cup with nowhere to drain. The post's cut end sits in standing water permanently, and end grain wicks water like a bundle of straws. That is the single fastest way to rot a post from the bottom up.
With a gravel base, the post sits on stone, water drains down and out, and the concrete column starts above that layer.
2. Crown the concrete. Bring it an inch or two above grade and slope it away from the post in every direction, like a tiny hat. A flat or dished top holds a puddle against the post for days after every rain, and that puddle is what rots the post at grade. Crowning costs 30 seconds and buys years.
3. Seal the cut end. Coat the buried end with a wood preservative before setting. Factory treatment is thinnest at a fresh cut, and the cut end is exactly where water gets in.
Do all three, on ground-contact-rated posts, and you've roughly doubled post life for pocket change and 15 minutes per post.
Setting the posts, in order
- Dig the hole. A powered auger is worth renting past about 10 holes, and a one-person unit rents by the day.
- Add 4 to 6 inches of crushed stone and tamp it.
- Drop the post in and brace it. Two scrap 1x4s screwed to adjacent faces, running down to stakes, hold it while you work.
- Plumb it in both directions with a post level or two spirit levels. Check against the string line for alignment as well as plumb.
- Fill. Wet-mixed concrete poured and rodded to release air, or gravel tamped in 4 to 6 inch lifts, or foam poured and left alone.
- Recheck plumb immediately. Concrete moves a post more than you'd think while it's being placed.
- Crown the top and slope it away.
- Leave the braces on. Twenty-four hours minimum before rails go on, a full week before you hang a gate.
Set the ends and corners first, then run the string between them and set the line posts to that string. Setting them in order from one end lets small errors accumulate.
Set posts long and cut them to height afterward. Run a string from the first post to the last at your finished height, mark each post, and cut them all in one pass. Trying to set each post to its final height as you go is far harder and the tops end up ragged.
Step 2: rails, pickets, and panels
Stick-built means rails and individual pickets attached on site. It's slower, it costs less, it handles slopes and irregular spacing better, and the result is stronger.
- Two rails for fences up to about 4 feet, three rails for a 6-foot privacy fence, and the third rail should sit near the middle where pickets want to cup.
- Pickets attach with two screws or ring-shank nails per rail. Screws hold better and let you replace a picket later.
- Standard 5.5-inch pickets butted tight give you roughly 17 to 18 pickets per 8-foot bay, and a shadowbox or spaced layout uses fewer.
Preassembled panels are faster and require exact post spacing, since a panel does not stretch. If a panel run doesn't divide evenly, you cut one panel down and you'd rather that happen at the least visible end.
Leave the pickets off the ground. A 2-inch gap at the bottom keeps end grain out of the wet soil and out of the mower's way. Set a scrap block as a spacer so every picket sits at the same height.
Step 3: fencing on a slope
Ground is rarely flat, and there are exactly two ways to handle it.
Stepped. Each fence section stays perfectly level, and the sections step down the slope like a staircase. The top line is horizontal in each bay with a visible jog at each post.
- Works with preassembled panels, which cannot be angled.
- Looks formal and deliberate, and suits picket, vinyl, and ornamental metal.
- Leaves a triangular gap under the low end of each section, which you fill with a kickboard or a rot board, or by digging in a bit.
- Needs longer posts, because each post has to cover the step.
Racked (also called raked or parallel). The rails follow the ground and the pickets stay vertical, so the fence runs parallel to the grade with no gaps underneath.
- Requires stick-building, or panels specifically sold as rackable.
- No gaps at the bottom, which matters a lot if you're keeping a dog in.
- Handles gentle to moderate slopes best. Many rackable panel systems are rated for around 1 foot of drop over an 8-foot section, so check the spec.
- Looks more natural on a rolling yard.
Rule of thumb: gentle and consistent grade, rack it. Steep, terraced, or panel-based, step it. On a long run you can do both, racking the gentle stretches and stepping where it drops off.
Either way, run your string line first and measure the actual drop over each bay before you buy anything. That number decides the method.
Step 4: gate posts get their own rules
Nearly every fence fails at the gate first, and it isn't bad luck.
A line post carries static load: the fence sitting there, plus wind. A gate post carries dynamic load. The gate hangs off one side, putting a permanent twisting force on the post's top. Every time someone opens it, that force swings. Then someone lets it slam, or a kid rides it. A 5-foot wide wood gate can weigh 60 to 100 pounds hanging entirely off one edge.
So gate posts get upgraded on every dimension:
- Go up a post size. 6x6 where the line posts are 4x4. The stiffness matters more than the strength.
- Add 6 to 12 inches of depth beyond the line posts.
- Widen the hole to 16 to 18 inches.
- Always concrete, always wet-mixed. This is the one post where gravel is the wrong call.
- Let it cure a full week before hanging the gate. Hanging a heavy gate on a 24-hour footing is how a post ends up permanently an inch out of plumb, which then makes the gate drag.
- Use three hinges, not two, on any gate 5 feet wide or over about 60 pounds, and use heavy strap hinges with through-bolts rather than short screws.
- Build an anti-sag brace into the gate itself: a diagonal running from the top hinge-side corner down to the bottom latch-side corner, in compression. Get that direction backwards and the brace does nothing.
- Leave clearance. About 1/2 inch on the hinge side and 3/4 inch on the latch side, plus ground clearance so the gate swings over snow and grass.
If a gate already sags, check the post for plumb before you blame the hinges. A gate post leaning half an inch at the top drops the latch side by an inch or more.
Worked example: 148 feet of 6-foot privacy fence with one gate
Two runs meeting at a corner: 88 feet along the back, 60 feet down the side, with a 4-foot gate in the side run. Local enforced frost depth is 30 inches.
Step 1: which depth rule governs?
- One-third rule: 6 feet above grade means a 9-foot post with 36 inches buried.
- Frost rule: 30 inches.
The one-third rule is deeper, so 36 inches it is. Gate posts get 6 more, so 42 inches.
Step 2: post count at 8-foot spacing.
- Back run, 88 ft: 88 / 8 = 11 bays, so 12 posts including the corner
- Side run, 60 ft: 4 ft of that is the gate opening, leaving 56 ft of fence = 7 bays. That's 7 bays plus 1 gate opening = 8 openings, so 9 posts, minus the shared corner = 8 new posts
- Total: 20 posts, of which 2 are gate posts, 1 is a corner, and 2 are ends
Step 3: what to buy for posts.
- 18 posts: 9-foot 4x4, ground contact rated
- 2 posts: 9-foot 6x6, ground contact rated, for the gate
Step 4: hole sizes.
- Line, corner, and end posts: 12-inch diameter x 36 inches deep
- Gate posts: 16-inch diameter x 42 inches deep
- Every hole gets 6 inches of 3/4-inch crushed stone in the bottom first, so the concrete column is 30 inches on line posts and 36 inches on gate posts
Step 5: concrete.
- Line posts: about 3 bags of 80 lb mix each, so 18 x 3 = 54 bags
- Gate posts: 5 to 6 bags each, so 12 bags
- Total: 66 bags of 80 lb concrete
That's roughly 5,300 pounds, which is a real pallet and a real truck. Our concrete calculator handles the cylinder math for any hole size and post count.
Step 6: rails and pickets.
- 18 fence bays total (11 + 7)
- 3 rails per bay: 18 x 3 = 54 rails, 2x4 x 8 ft
- Pickets at 5.5 inches butted tight: 96 / 5.5 = 17.5, so 18 pickets per bay
- 18 x 18 = 324 pickets, 6 ft x 5.5 in
- Screws at 6 per picket (two per rail): about 1,950 screws, so buy 2,000 in hot-dip galvanized or stainless
Step 7: the materials list, and what moves each line.
| Item | Quantity | What sets the number |
|---|---|---|
| 9 ft 4x4 ground contact posts | 18 | Post length, which is set by fence height plus burial depth. Going from a 6 ft to an 8 ft fence changes this line twice over |
| 9 ft 6x6 ground contact gate posts | 2 | A 6x6 costs several times what a 4x4 does. Use them anyway at gates |
| 80 lb concrete mix | 66 bags | Hole diameter and depth. A 12 inch hole takes nearly double the mix of a 10 inch one at the same depth |
| 3/4 in crushed stone | about 6 cu ft | Bags for a small job, by the ton for a large one, where it is far cheaper |
| 2x4 x 8 ft rails | 54 | Two rails or three. Three rails costs half again as much and is what keeps a 6 ft fence from bowing |
| 6 ft cedar or PT pickets | 324 | The largest line by far, and the one where species choice matters most. Cedar and pressure treated pine are a long way apart |
| Screws, hot-dip galvanized | 2,000 | Cheap in bulk. Stainless costs several times galvanized and is worth it on cedar |
| Gate hardware, 3 hinges plus latch | 1 set | Light residential hardware and heavy through-bolted hardware differ by a lot. Buy heavy |
| Post cap or preservative for cut ends | A minor line, and skipping it is how posts rot from the top |
Total that list at your own lumberyard. Pickets and posts together are most of it, so the species you pick changes the number more than anything else on the page.
Add tool rental: a one-person auger rents by the day, and 20 holes is a full day.
Labor, if you hire it out. Installed wood privacy fence is quoted per linear foot. What moves that rate: fence height, picket species, whether it is two rails or three, how many gates and corners, soil (rock and heavy roots are the biggest surprise line), grade across the run, access for a truck and an auger, and tear-out of an old fence, which is usually a separate line. Get bids on identical scope, and make each one state the post depth, the setting method, the rail count, and whether demolition and haul-away are in or out. A bid that comes in well under the others is nearly always shallower posts, two rails instead of three, or demolition left off.
Time, doing it yourself: a day for layout and 811 waiting, a day of digging and setting, a week of curing, then two days for rails, pickets, and the gate.
Common mistakes that cost you the fence
- Digging before calling 811. Free, required in most states, and it takes a few days. Hitting a gas line with an auger is a genuinely bad afternoon.
- Guessing at the property line. A survey costs less than moving a finished fence.
- Buying 8-foot posts for a 6-foot fence. That leaves 24 inches buried, which is the code floor and not a good depth.
- Above-ground-rated lumber in the ground. Read the end tag.
- No gravel in the bottom of the hole. You built a bucket and put the post's end grain in it.
- A flat or dished concrete top. Crown it so water runs away.
- Uneven bay spacing with a short orphan panel at the end. Divide the run evenly instead.
- Treating the gate post like a line post. It's the post most likely to fail and the one most people undersize.
- Hanging the gate the day after setting the post. Give it a week.
Frequently asked questions
Do I really have to call 811 before installing a fence?
Yes. It's free, it's legally required in most states before any excavation, and utility locates take two to three business days, so call the week before. Mark your dig area in white first, hand dig within about 18 to 24 inches of any mark, and remember that 811 marks public utilities only. Private lines to a shed, garage, septic field, or irrigation system are yours to locate.
How far apart should fence posts be?
Eight feet on center is the standard for wood privacy fence and matches 8-foot rail stock. Six feet is stiffer and better in high wind or with heavy 6-foot sections. Preassembled panels dictate exact spacing with no room to adjust. Whatever the spacing, divide each run evenly rather than leaving a short orphan bay at one end.
Should fence posts be set in concrete or gravel?
Both work. Concrete holds better and is the right call for gate posts, corners, tall fences, and loose or sandy soil. Compacted angular gravel drains far better and often lets a wood post outlast the same post in concrete, since posts rot at the ground line rather than pulling out. Either way, put 4 to 6 inches of crushed stone in the bottom of the hole.
How do you build a fence on a slope?
Two options. Stepped keeps each section level and steps down like a staircase, which suits preassembled panels but leaves a triangular gap under each low end. Racked lets the rails follow the grade with pickets staying vertical, which leaves no gaps and looks more natural but requires stick-building or panels sold as rackable. Measure the actual drop per bay before you buy.
Do I need a permit to install a fence?
Often, especially above a certain height. Beyond the permit, check your municipality's height limits (commonly 6 feet in a rear yard and 4 feet in front), the required setback from the property line, and any sight triangle rule on a corner lot. If you're in an HOA, get written approval on material, color, height, and which way the finished side faces before you order anything.
How long does concrete need to cure before I attach the fence?
Give it at least 24 hours before hanging rails, and leave the post braces on for that whole time. For gate posts, wait a full week before you hang the gate. Fast-setting post mixes are workable in 20 minutes to 4 hours, but workable is not cured, and a heavy gate hung on a green footing will pull the post out of plumb permanently.
How much does it cost to install a fence per linear foot?
Fence is always quoted per linear foot, so start by measuring your run and counting your gates and corners. From there the rate is set by height, picket species, rail count, setting method and post depth, and the ground itself. Rocky soil, tree roots, steep grade, and tear-out of an old fence are the four things most likely to move a bid after it is signed, so ask about all four up front. Doing it yourself costs materials and an auger rental, and roughly halves the number, because labor is the larger share of an installed fence. Get two or three bids on identical scope and compare the line items, not the totals.
Why do fence gates sag, and how do I prevent it?
Because a gate puts a constant twisting load on one post that line posts never see. Prevent it with a 6x6 gate post set 6 to 12 inches deeper in a wider hole with wet-mixed concrete, a full week of cure before hanging, three heavy through-bolted hinges instead of two, and a diagonal brace in the gate itself running from the top hinge corner down to the bottom latch corner. If a gate is already sagging, check the post for plumb before blaming the hardware.
Related: Fence post depth has the full depth chart, frost line table by region, and concrete volume per hole. The fence calculator gives you post, rail, and picket counts, and the concrete calculator sizes the bags for your exact hole dimensions.