How to Season Firewood: Stacking, Timing and Moisture

Here's how to season firewood: split it as soon as you can, stack it in a single row off the ground where sun and wind can get at it, cover only the top, and leave it alone until a moisture meter on a freshly split face reads under 20 percent. Softwoods like pine and spruce usually get there in six to twelve months. Most hardwoods want a full year, and the dense ones like oak and hickory often need closer to two.
That's the whole recipe. Everything below is about doing each step well, because a stack that's thrown in a damp corner and tarped to the ground can sit for two years and still hiss in the stove.
Updated September 2026
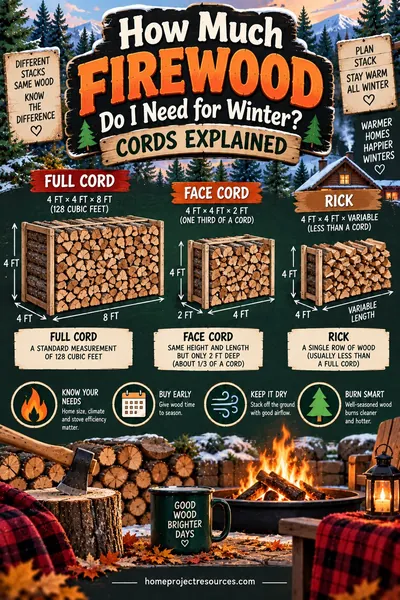
First, size the stack. A woodpile is just a box of air and wood, so measure yours as length by height by the length of your splits and run it through our free Cubic Yard Calculator. It gives you cubic feet, which is the unit firewood is actually sold and stored in. If you're still working out how big a pile you need in the first place, that's a separate question, and we answer it in how much firewood do I need for winter.
Why green wood is such a bad deal
A freshly cut tree is heavy because a big share of its weight is water. Depending on the species and the time of year it was felled, green wood can hold anywhere from a third to more than half its weight in moisture. Every bit of that water has to boil off before the wood will actually burn.
That costs you three ways:
- Wasted heat. The fire spends its energy turning water into steam instead of warming your room. You feed the stove more and feel less.
- Smoke. Wet wood smolders at a low temperature, and low temperatures mean incomplete combustion. That's the thick, sour smoke that hangs in the yard and drifts back into the house.
- Creosote. Cool, smoky flue gases condense on the inside of the chimney as creosote, a tarry, flammable coating. It's the main cause of chimney fires, and green wood builds it far faster than dry wood does.
So seasoning isn't fussiness. It's the difference between a stove that heats and a stove that smokes.
What "seasoned" actually means: the 20 percent target
Seasoned firewood is wood that's been dried until its moisture content is low enough to burn cleanly. The number that matters is 20 percent or less, measured on the inside of a freshly split piece, not on the weathered outside.
That threshold isn't ours. The EPA's Burn Wise program sets it as the target for clean, efficient burning, and it's the number stove manufacturers design around. Wood at 15 percent burns a little better still, and wood that's been dried in a heated space can go lower, but under 20 is the line that separates "seasoned" from "not yet."
Two things trip people up here. First, moisture content is a percentage of the wood's weight, so a piece that reads 40 percent isn't "twice as wet" in any way you can see. It just feels a bit heavier. Second, the outside of a split dries long before the inside does. A piece can be checked and silvery on the surface and still be soaking in the core, which is why the meter test below has you split a piece open first.
How to tell if firewood is seasoned
You've got two tests. One costs the price of a pocket meter, the other is free and surprisingly reliable once you've done it a few times.
The meter test. A pin-type moisture meter is the only way to get a real number. Pull a piece from the middle of the stack, split it, and press the pins firmly into the fresh inside face along the grain. Take three or four readings on a couple of pieces and use the highest one. If the core reads under 20 percent, the stack is ready. If the outside reads 18 and the fresh face reads 30, it isn't, no matter what the surface looks like.
The bang test. Knock two seasoned splits together and you get a sharp, hollow crack, a bit like a baseball bat. Green splits make a dull thud. It works because dry wood is lighter and stiffer, so it rings instead of absorbing the blow.
Here's the full set of signs, and how much to trust each one:
| Sign | What seasoned wood shows | How reliable it is |
|---|---|---|
| Moisture meter on a fresh split | Under 20 percent | The only real proof |
| Sound when two pieces knock together | Sharp, hollow crack | Good, once your ear is trained |
| Weight | Noticeably lighter than a green piece of the same size | Good if you can compare |
| End grain | Radial cracks (checking) spreading from the center | Useful but not proof; the surface dries first |
| Color | Faded, gray-brown instead of fresh cream or yellow | Weak; weathering isn't drying |
| Bark | Loose, easy to peel or already falling off | Decent on most species, poor on some |
| Smell | Faint, woody, no sharp sap smell | Weak |
| In the stove | Catches easily, burns with little smoke, no hissing | The final exam |
The pattern to notice: the visual signs tell you the surface has dried. Only the meter, the weight and the sound tell you about the core.
How to season firewood step by step
Do these in order and you'll get dry wood in the shortest time your climate allows.
- Cut to length now. Buck the logs to the length your stove takes, usually 16 inches for a standard firebox, before you do anything else. Water leaves wood mostly through the end grain, so shorter pieces dry faster than long logs.
- Split right away. Don't leave rounds sitting for a season. Split them while the wood is green and easy to split, into pieces roughly 3 to 6 inches across. Splitting opens the inside face to the air and multiplies the drying surface.
- Pick a sunny, breezy spot. Sun warms the wood and wind carries the moisture away. A stack against the north side of the house, hemmed in by a fence, dries at a fraction of the speed of one out in the open.
- Get it off the ground. Stack on pallets, a row of 2x4s, or a rack. Wood in contact with soil wicks up moisture from below and starts to rot before it ever dries.
- Stack in a single row with the bark side up. One row deep, so air moves through every piece. Bark up sheds rain; bark down traps it.
- Cover the top only. A strip of metal roofing, plywood or a tarp over the top course, with the sides fully open. More on this below, because it's the step most people get backwards.
- Wait, then test. Check with a meter when the calendar says it should be close. If it isn't, give it another season. Nothing else you do can shortcut the last few months.
How to stack firewood for airflow
A woodpile dries from the outside in and from the ends inward. Your stack should make it as easy as possible for air to reach both.
Single rows beat blocks. A stack one split deep, running along a fence line or between two posts, exposes every piece to moving air. A big square block of wood dries fast on the outside and hardly at all in the middle. If you have to build more than one row, leave a gap of a few inches between rows so the air can move between them.
Ends need support. The easiest way is two T-posts or 4x4s driven at each end. The old-fashioned method is a cross-stacked column at each end: two pieces laid one way, two laid across them, up to the full height. It looks like a small log cabin and it holds the row from spilling.
Keep it manageable in height. Around 4 feet is comfortable to build and stable enough not to lean. That height is also convenient for measuring, because a row 4 feet high and 8 feet long is the standard "face" that firewood is measured by.
Bark up on the top course. Bark is the tree's own rain jacket. On the top row it sheds water outward. Lower down it matters less, but stacking bark up throughout is the habit worth building.
Loose is good. Don't pack the splits tight like a stone wall. A slightly ragged stack with gaps between pieces dries faster than a tidy, airtight one. The old rule of thumb is that a mouse should be able to run through it but a cat shouldn't.
Cover the top, never the sides
This is the step that ruins more woodpiles than any other. A tarp pulled down over the whole stack and weighted at the bottom feels like protection. It's actually a greenhouse. Moisture leaving the wood hits the plastic, condenses, and drips right back down onto the pile. Add a little warmth and you've built a mold farm.
The right way is a cover over the top course only, with every side open to the wind:
- A sheet of metal roofing or exterior plywood laid on top and weighted with a few splits is ideal. It's rigid, it doesn't sag into puddles, and it lets air move under it.
- If you use a tarp, cut or fold it so it overhangs the top by a few inches on each side and no more. Weight it on top of the stack, not by wrapping it down the sides.
- In a very dry climate, or for the first summer of drying, some people leave the stack completely uncovered until fall. Rain on the surface evaporates quickly; it's the water in the core you're fighting.
Once the wood is fully seasoned and moved to where you'll burn it from, a roof and a windward side become more useful. Until then, top only.
How long to season firewood by species
This is where every honest answer starts with "it depends." Drying time is set by how dense the wood is, how big you split it, how much sun and wind the stack gets, and the humidity where you live. A stack in a dry, windy high-desert yard can be ready in half the time of the same stack in a humid river valley.
With that said, here's the shape of it:
| Wood type | Common examples | Typical time to reach under 20 percent |
|---|---|---|
| Softwoods | Pine, spruce, fir, cedar | About 6 to 12 months |
| Lighter hardwoods | Poplar, aspen, birch, soft maple, ash, cherry | About 9 to 12 months, ash and cherry on the faster end |
| Dense hardwoods | Oak, hickory, hard maple, beech, locust | About 12 to 24 months, red and white oak commonly the full two years |
A few notes on reading that table:
- These assume good stacking. Split, single row, sunny, breezy, top covered. A poorly stacked pile of oak can still be wet after three years.
- "Months" mostly means warm months. Wood dries very little in a cold, damp winter. A stack built in April gets a full summer's worth of drying before the burning season; one built in October effectively starts the following spring.
- Ash is the exception people love. It's a hardwood with unusually low green moisture, so it dries faster than its density suggests. It's still better with a summer behind it.
- The meter settles the argument. Whatever the table says, the stack is ready when a fresh split reads under 20. Test rather than trust the calendar.
If you're buying wood rather than cutting it, "seasoned" on the ad doesn't mean anything until you've checked it. Plenty of "seasoned" wood was cut a few months ago and left in a heap. Split a piece and meter it before you stack it.
Split first: why splitting matters so much
Bark exists to keep water in the tree. A whole round, even a short one, dries almost entirely through its two cut ends, and that's slow. Split that round into four and you've added four big faces of open grain to every piece. That's why split wood can be ready in a year while the same wood left in rounds is still green.
Green wood is also easier to split. The fibers haven't tightened up, the piece is straight-grained and wet, and a maul goes through it cleanly. Rounds that sit for a year get tougher, and some species turn stringy and stubborn. Split it the week you cut it if you possibly can.
Size matters too. Splits about 3 to 6 inches across dry quickest and fit most stoves. Bigger pieces are fine for overnight burns, but they take proportionally longer to season, so keep them to a minority of the pile.
A worked example: one stack from cut to stove
Say you take down a red oak in early April and buck it to 16-inch lengths. You split everything by mid-April and build one row along the south side of the yard: 8 feet long, 4 feet high, one split deep, so the depth is 16 inches.
Run that through the calculator: 8 feet by 4 feet by 1.33 feet is 42.7 cubic feet, which is exactly one-third of a full 128-cubic-foot cord. That's a useful number to know, because it tells you this row is a third of a cord's worth of drying space, and you can plan the rest of the yard around it.
Now the timeline:
- Mid-April: stacked, top covered with a sheet of plywood, sides open. A meter on a fresh split reads in the high 40s.
- Late September: after one summer, the outsides are gray and checked. A fresh split reads in the mid 20s to about 30. Not ready, and burning it now would be smoky. Leave it.
- Following September: after a second summer, a fresh split from the middle of the row reads 17 to 19 percent. Ready. Move it under a roof near the door and start burning it that fall.
If the same tree had been ash instead of oak, the first September reading would likely have been close to 20 already and you'd have burned it that winter. If it had been pine, it would have been ready by late summer of the first year. Same yard, same method, different clocks.
Kiln dried vs seasoned firewood
Kiln-dried firewood has been baked in a heated chamber to bring the moisture down quickly, often well under 20 percent. It lights instantly and burns clean, and it's the wood you want if you need dry fuel this week rather than next year. The trade-off is that you're paying someone to do with energy what a year in the sun does for free, and it will pull moisture back in if you store it outdoors uncovered.
Air-seasoned wood, done right, reaches the same target. It just takes patience. There's nothing in a dry oak split that came out of a kiln that isn't in a dry oak split that came off your rack. The stove can't tell the difference; only your calendar can.
The practical move for most people is a mix: season your own for next year, and if you're caught short this year, buy a small quantity of kiln-dried to bridge the gap while the stack finishes.
Where the stack goes, and where it shouldn't
A few placement rules save trouble later:
- Not against the house. A woodpile pressed against siding holds moisture against the wall and gives insects a covered walkway indoors. Keep the drying stack out in the yard, and bring in only a few days' worth at a time.
- Not under the eaves without a gutter. A roof edge dumps concentrated runoff onto whatever's below. If your eaves drip, either fix the gutters first (see how to clean gutters) or move the stack.
- A woodshed is for finished wood. A three-sided shed with an open front is a fine place to keep seasoned wood dry and handy, but it's a poor place to dry green wood because it blocks the sun and much of the wind. If you're planning one, how to build a shed covers the base and framing.
- Rotate the pile. Burn from the oldest row first. Mark each row with the month you stacked it so you're never guessing.
- Add it to the calendar. Stacking in spring and testing in fall is the kind of thing that slips. Our home maintenance checklist has a spot for it.
FAQ
Can you season firewood in a garage or basement?
Not well. Drying needs moving air and, ideally, sun, and an enclosed space gives you neither. Green wood in a basement mostly just raises the humidity in the house and invites insects. Season it outdoors, then move a week or two of finished, dry wood inside as you need it.
Does firewood season faster in the sun or in the shade?
Sun, by a wide margin. Warm wood releases moisture faster, and a sunny spot is usually also a drier one. Shade with strong wind is the second-best option. Shade with still air is the slowest of all and is where mold and rot start.
Why does my firewood smoke even though it looks dry?
Almost always because the inside is still wet. The gray, checked surface only tells you the outer half-inch has dried. Split a piece and put a moisture meter on the fresh face. If it reads over 20 percent, that's your smoke. If it genuinely reads under 20, the problem is more likely the stove or chimney than the wood.
Should I cover firewood with a tarp?
Only the top. Wrap a tarp down the sides and you trap moisture inside, which slows drying and encourages mold. Lay it over the top course, let it overhang a few inches, weight it with a couple of splits, and leave every side open to the air.
How long does it take to season oak?
Plan on two summers for red or white oak split to normal stove size, and confirm with a meter before you count on it. Oak is dense and holds a lot of water when green, and it's the species most often sold as "seasoned" when it isn't. In a hot, dry climate you may get there in a year; in a humid one, two is realistic.
Is it better to season firewood in rounds or split?
Split, always. A round dries only through its two ends and through the bark, which is designed to keep water in. Splitting exposes the inside grain and can cut the drying time dramatically. It's also far easier to split wood while it's green.
How do I know how much drying space I need?
Measure the row you plan to build and convert it to cubic feet with the Cubic Yard Calculator. A full cord stacked 4 feet high with 16-inch splits needs a row 24 feet long, or three 8-foot rows with air gaps between them. If you're still deciding how many cords to put up, start with how much firewood do I need and work back to the space from there.