How to Insulate an Attic

Air seal before you insulate. That's the whole job in four words, and it's the step almost everyone skips. Insulation laid over unsealed gaps badly underperforms its rating, because warm air keeps streaming up through the top plates, the wiring holes, and the attic hatch, and fluffy insulation does nothing to stop moving air.
So the order is: seal every hole between the house and the attic, install baffles so you don't block the soffit vents, then blow or lay insulation to the R-value your climate zone calls for. Do it in that order and R-49 performs like R-49. Do it backwards and you paid for R-49 and got something closer to R-30.
Updated August 2026
A note on numbers. This page covers R-values, depths, bag counts, line items and the questions that make quotes comparable, not dollar figures. Material availability, utility rebates and trade rates all move by region and by season, and we do not set any of them. Take the checklists below to three insulation contractors instead.
Work out your quantities first. Our free insulation calculator turns your attic square footage and target R-value into bags or batts, so you can price the job before you buy anything.
How to Insulate an Attic, Step by Step
Here's the whole job in order. Each step gets its own section below.
- Inspect before you commit. Look for knob-and-tube wiring, vermiculite, wet or moldy insulation, and bath fans venting into the attic. Any of the first two stops the project until a pro looks at it.
- Measure the attic floor and the existing insulation depth. You need square footage and current R-value to know what to add.
- Set your target R-value from your DOE climate zone, then check it against your local code.
- Air seal everything. Top plates, penetrations, recessed lights, the hatch, chases, and flues. This is the step that makes the rest of it work.
- Install baffles at every rafter bay with a soffit vent below it, plus a dam at the eave.
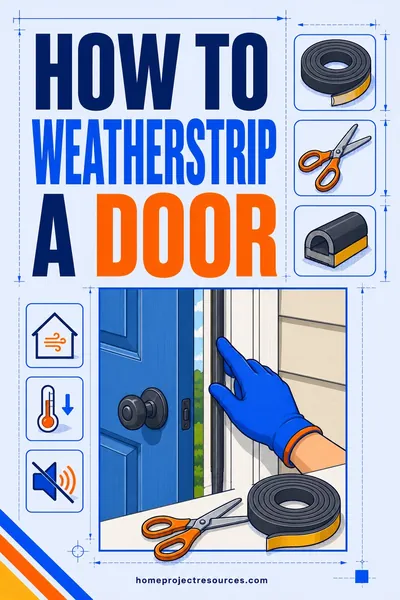
- Fix the attic hatch. Weatherstrip it and glue rigid foam to the back.
- Install depth markers so you can verify how deep you've actually gone.
- Blow or lay the insulation, working from the far corners backward toward the hatch so you never walk on finished work.
Plan on a full weekend for a typical 1,200 square foot attic if you're doing it yourself, split roughly a day on air sealing and half a day blowing.
Why Air Sealing Comes First
Heat leaves your house two ways. It conducts through solid materials, which is what R-value measures, and it rides out on moving air, which R-value doesn't measure at all.
In a typical older house, air leakage accounts for a big share of the winter heat loss from the ceiling plane. Warm indoor air is buoyant. It finds every gap in the top of the house, pushes through, and drags conditioned air out with it while cold air gets pulled in downstairs. That's the stack effect, and your attic is the top of the stack.
Fiberglass and cellulose are air permeable. Air moves through fiberglass roughly the way it moves through a wool sweater. Piling more of it over an open hole doesn't plug the hole. It just hides it.
Here's the practical test. If you've ever seen dark, dirty streaks in attic insulation around a light fixture or a pipe, that's insulation acting as a filter for air that's been passing through it for years. Every dirty spot is a leak you can find and seal.
Air sealing an average attic is a small fraction of the insulation job, whether you do it yourself or hire it out. It is the cheapest part of the project and the part that decides whether the rest of it works, which makes skipping it the single worst trade in home energy work.
Air Sealing Targets: The List to Work Through
Do these in order. Bring a bright headlamp, canned foam, a caulk gun, a roll of aluminum flashing, and fire-rated sealant.
- Top plates. The top edge of every interior and exterior wall, where the drywall meets the framing. Pull back the existing insulation and you'll find a continuous crack along both sides of the plate. Caulk or foam it. This is usually the single biggest leak by total area in the whole house.
- Plumbing and wiring penetrations. Every drilled hole where a wire, pipe, or vent passes through the ceiling framing. Small gaps get caulk, gaps over about a quarter inch get canned foam.
- Plumbing vent stacks. The big PVC or cast iron pipe running up through the roof. Foam or caulk the gap where it passes through the ceiling framing.
- Recessed lights. Older non-IC-rated cans have to keep a 3 inch clearance from insulation and cannot be covered, which makes them permanent open holes into the attic. The clean fix is replacing them with IC-rated airtight fixtures or LED retrofit modules that seal to the ceiling. Sealing a non-IC can with foam is a fire hazard, so don't.
- The attic hatch or pull-down stairs. Almost always the worst single leak, and almost always ignored. Weatherstrip the perimeter, add a latch that pulls the hatch tight, and glue rigid foam board to the back of the panel. Pull-down stairs need an insulated cover box over the whole opening.
- Bath and kitchen exhaust fans. Seal the housing to the drywall. Then confirm the duct actually runs to the outside. A fan dumping humid air into the attic soaks the insulation and grows mold, and it's a common find in older houses.
- Chimney and flue chases. This one has a hard rule. Never put canned foam, caulk, or fiberglass against a flue. The gap around a masonry chimney or metal B-vent gets sealed with sheet metal cut to fit and fastened down, then sealed at the edges with high temperature, fire-rated sealant. Building code requires a clearance to combustibles around flues, typically 1 inch for masonry and 2 inches for a metal flue, so the metal collar holds that gap open while blocking airflow.
- Dropped soffits and chases. Boxed-out ceilings over cabinets, and open stud bays above interior soffits, are often wide open to the attic. Cap them with rigid foam or drywall scrap and seal the edges before insulating over the top.
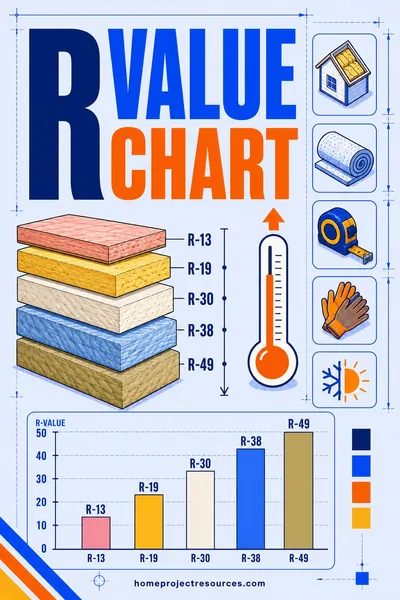
Attic R-Value by Climate Zone
These are the current Department of Energy and ENERGY STAR recommendations for attic insulation in an existing home. They're guidance, not law. Your local building code sets the minimum, and in some jurisdictions the code number is lower than the DOE recommendation while in others a stretch code sets it higher. Check with your building department before you buy, especially if you're pulling a permit for other work.
| DOE climate zone | Typical states | Recommended attic R-value (uninsulated) | If you already have 3 to 4 inches |
|---|---|---|---|
| Zone 1 | South FL, HI, Guam | R-30 to R-49 | Add R-25 to R-38 |
| Zone 2 | TX Gulf Coast, LA, central FL, southern AZ | R-49 to R-60 | Add R-38 to R-49 |
| Zone 3 | GA, SC, most of TX, southern CA, AL | R-49 to R-60 | Add R-38 to R-49 |
| Zone 4 | VA, TN, KS, MO, coastal OR and WA | R-60 | Add R-49 |
| Zone 5 | IL, IN, OH, NE, most of NY and NM | R-60 | Add R-49 |
| Zone 6 | MN, WI, MI, VT, ME, MT | R-60 | Add R-49 |
| Zone 7 | Northern MN, ND, northern ME | R-60 | Add R-49 |
| Zone 8 | Interior Alaska | R-60 | Add R-49 |
Two things people misread on this table. First, R-60 is the recommendation for a new attic install in most of the country now, not R-38, which was the old rule of thumb and still shows up in outdated advice. Second, the returns taper. Going from R-11 to R-30 is a large comfort change. Going from R-49 to R-60 is a small one, worth doing while you're already up there and hard to justify as a standalone project.
Our R-value insulation chart has the full per-inch numbers and the wall and floor targets if you're insulating more than the attic.
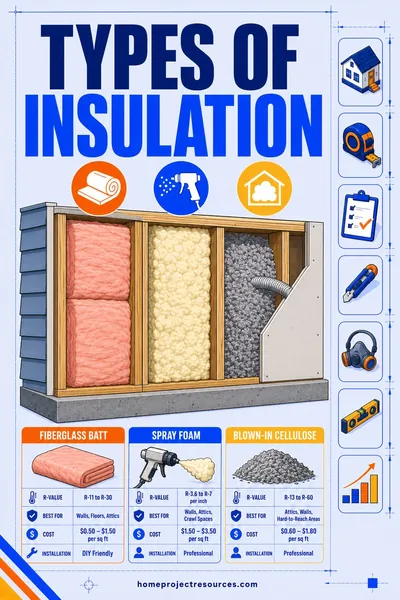
Attic Insulation Materials Compared
| Material | R per inch | Depth for R-49 | Relative material cost per sq ft | DIY feasibility |
|---|---|---|---|---|
| Fiberglass batts | R-3.1 to R-3.4 | 15 to 16 in (two layers) | Cheapest per square foot | Easiest. Utility knife and patience. Slow over a big attic and hard to fit around obstructions without gaps. |
| Blown cellulose | R-3.2 to R-3.8 | 13 to 15 in | Slightly above batts | Very doable. Rent or borrow a blower, one person feeds the hopper, one runs the hose. Dusty. Fills irregular spaces better than anything else. |
| Blown fiberglass | R-2.2 to R-2.7 | 18 to 22 in | About the same as cellulose | Same process as cellulose, less dust, lighter. Needs more depth for the same R, so joist height and roof pitch can limit you. |
| Open-cell spray foam | R-3.5 to R-3.9 | 13 to 14 in | Roughly triple the blown options, installed | Not a DIY job. Applied at the roof deck to create a conditioned attic, which is a different design decision, not just more insulation. |
| Closed-cell spray foam | R-6.0 to R-7.0 | 7 to 8 in | The most expensive by a wide margin, installed | Not a DIY job. Kits are a poor value at attic scale. Best used in small amounts for air sealing, not as the main attic insulation. |
For most attics the honest answer is blown cellulose or blown fiberglass over an air-sealed ceiling. It's cheap, fast, and it flows into the awkward spots where batts leave gaps. Batts make more sense in a small, tidy attic with clear joist bays and easy access. Our types of insulation guide compares all of them including the ones better suited to walls and basements.
Spray foam at the roof deck turns the attic into conditioned space, which changes your ventilation requirements, your HVAC duct losses, and sometimes your roof warranty. It's a legitimate approach and it's a design decision to make deliberately with a contractor, not an upgrade you tack onto a floor insulation job.
Ventilation: Never Block the Soffit Vents
A vented attic works because outside air enters low at the soffits, washes up the underside of the roof deck, and exits high at a ridge or gable vent. That airflow carries out moisture and heat. Block the soffits and you get condensation on the sheathing in winter and, in cold climates, ice dams.
The problem is geometry. At the eaves, the roof deck comes down to meet the top plate, and the space gets tight exactly where you're trying to pile in 14 inches of insulation. Push insulation into that wedge and you've plugged the vent.
Baffles are the fix. They're stiff cardboard, plastic, or foam channels that staple to the underside of the roof deck in each rafter bay, holding open a 1 to 2 inch air channel from the soffit up past the insulation. Install one in every bay that has a soffit vent below it, before you insulate. Add a wind baffle or dam at the eave so blown insulation can't spill over the top plate into the soffit.
The standard ventilation requirement is 1 square foot of net free vent area for every 150 square feet of attic floor, which drops to 1 in 300 when the venting is split roughly evenly between low and high vents and a vapor retarder is present. Net free area is the actual open area of the vent after the screen and louvers, and it's printed on the product. It's always less than the hole it covers.
The Vapor Retarder Question
There's no single right answer here, and that's why the advice online contradicts itself. It depends on your climate.
In cold climates (zones 5 through 8), moisture generally drives from the warm inside toward the cold attic in winter. A vapor retarder belongs on the warm-in-winter side, which means at the ceiling, under the insulation. That's what the kraft paper facing on existing batts is doing.
In hot, humid climates (zones 1 through 3), the drive is often the other way for much of the year, and an interior vapor retarder can trap moisture rather than stop it. Standard practice is to skip it and let the ceiling dry inward.
In mixed climates (zone 4), air sealing does more than a vapor retarder either way, and most builders skip a dedicated retarder at the ceiling.
The rule that matters more than any of that: never install a second vapor retarder. If your attic already has kraft-faced batts, do not lay new faced batts on top with the facing up. You've now sandwiched insulation between two retarders and any moisture that gets in can't leave. Use unfaced batts over faced ones, or blow loose fill over the top, which is what most people do anyway.
Blown cellulose and blown fiberglass have no facing, so this problem takes care of itself.
Adding Over Existing Insulation, or Removing First
Adding over the top is cheaper, faster, and usually correct. Remove first only when one of these is true.
Remove and replace when: - The existing insulation is wet, matted, or moldy. Wet insulation has lost most of its R-value and it won't dry under a fresh layer. - There's rodent contamination, meaning droppings, nesting, and urine odor. That's a health issue and a smell that gets worse when you cover it. - It's vermiculite. See the safety section below. This is a stop-and-test condition, not a remove-it-yourself condition. - You need access to the ceiling plane to air seal properly and the old insulation is in the way. In this case you're pulling it back, not necessarily throwing it out. - The attic will become conditioned space with foam at the roof deck.
Add over the top when: the existing insulation is dry, evenly distributed, and simply too shallow, which describes the large majority of attics. Pull it back at the top plates and penetrations, do your air sealing, push it roughly back, and blow over everything.
Removal isn't free. Professional attic insulation removal is priced by the square foot including bagging and disposal, it can rival the cost of the new insulation on a large attic, and it's a genuinely miserable DIY job with a vacuum rental. Don't do it unless one of the conditions above applies.
Attic Insulation Safety
Read this part before you go up the ladder. These outrank getting the job done today.
Respirator and eye protection, every time. An N95 is the minimum for fiberglass. Use a P100 for blown cellulose, which throws a lot of fine dust, and for any attic with old, dusty insulation. Add sealed safety glasses, gloves, and long sleeves. Fiberglass in your eyes is a bad night.
Walk on the joists or on planks, never on the insulation. Ceiling drywall will not hold you. Lay two scaffold planks or a sheet of plywood across the joists and move them as you go. Once blown insulation covers the joists you can't see where to step, which is why you insulate working backward toward the hatch.
Knob-and-tube wiring is a stop-and-call-an-electrician condition. If you see ceramic knobs and tubes with single cloth-covered conductors running through the framing, stop. Knob-and-tube depends on open air around the conductors to shed heat, and the National Electrical Code prohibits burying it in thermal insulation. Covering it is a real fire risk and it can void your homeowners insurance. Get a licensed electrician to evaluate and replace the circuits before any insulation goes in. Rewiring the affected circuits is usually the most expensive line in the whole project, and the spread is wide because it depends on how much knob-and-tube is left, how many circuits it feeds, and whether the electrician can fish new cable or has to open ceilings. It needs a permit and an inspection in most jurisdictions, so get three electrician quotes on the same written scope.
Vermiculite is a do-not-disturb. Vermiculite loose fill looks like small, shiny, gray-brown or gold pebbles, roughly the size of aquarium gravel, and it was widely installed before 1990. A large share of it came from the Libby, Montana mine and is contaminated with asbestos. Do not sweep it, vacuum it, walk through it, or add insulation on top of it. Leave the attic, keep the hatch closed, and have it tested by a certified asbestos inspector. If it needs to come out, that's licensed abatement work, not a weekend project. The same caution applies to any pre-1990 house for popcorn ceiling texture, old vinyl floor tile, and pipe wrap. Don't sand or scrape those either. Get them tested.
Pre-1978 homes: assume lead paint until tested. If your work touches painted surfaces, and the attic hatch trim usually is one, treat the paint as lead-bearing. Don't dry-sand or scrape it. For anything beyond minor work, an EPA Lead-Safe certified contractor is required under the RRP rule.
Other checks. Confirm every bath fan vents outdoors. Keep insulation 3 inches clear of non-IC recessed cans and any chimney or flue. Watch your head on roofing nails. And don't work up there in the middle of a summer afternoon, because a vented attic can run 130F or hotter. Early morning is the right call.
Worked Example: 1,200 Sq Ft Attic, R-19 to R-49
A 1970s ranch. The attic floor measures 40 ft by 30 ft, so 1,200 square feet. Existing insulation is old kraft-faced fiberglass batts sitting in 2x8 joist bays, about 6 inches deep, call it R-19. Target is R-49 for climate zone 4.
If you're not sure of your attic's area, measure the footprint of the heated space below and subtract anything not under the attic. Our square footage calculator handles the L-shapes and bump-outs.
Step 1: how much R do you need to add? R-49 target minus R-19 existing = R-30 to add.
Step 2: how deep is that? Using blown cellulose at R-3.5 per inch: 30 ÷ 3.5 = 8.6 inches. Round up and call it 9 inches of new material.
Total finished depth: 6 in existing + 9 in new = 15 inches. The joists are 7.25 inches tall, so the new layer buries them completely. Before you start, staple a few cheap depth rulers to the framing or make marks on the rafters at 15 inches so you can check depth as you go instead of guessing.
Step 3: bag math. Every bag of blown insulation has a coverage chart printed on it. It lists maximum square feet of coverage per bag at each R-value, and that's the number an inspector uses. For blown cellulose at R-30 added, a 30 lb bag typically covers 30 to 35 square feet.
1,200 sq ft ÷ 32 sq ft per bag = 37.5 bags. Buy 40 to be safe. Unopened bags usually go back.
Step 4: the line items to price.
| Line item | DIY | Hired out | What moves it |
|---|---|---|---|
| Air sealing materials (foam, caulk, fire-rated sealant, sheet metal) | You buy it | Folded into labor below | How many penetrations, cans and chases the ceiling has |
| Baffles, roughly 30 bays | You buy it | Folded in | Bay count, which is roof area divided by rafter spacing |
| Attic hatch insulation and weatherstripping | You buy it | Folded in | Hatch versus pull-down stairs |
| Air sealing labor | Your Saturday | A real line, ask for it separately | Attic clutter and headroom more than square footage |
| Insulation, 40 bags cellulose | You buy it | Folded in | Bag count, which is square footage divided by coverage at your target R |
| Blower rental (often free with a bag minimum) | Often free | Not applicable | Whether your supplier waives it above a bag count |
| Insulation labor and material, R-30 added over 1,200 sq ft | Not applicable | The largest single line | Access, pitch, and whether old insulation comes out first |
Get three written quotes on the same scope, and insist that air sealing appears as its own line rather than being folded into a single number. A quote that will not separate it is usually a quote that is not doing much of it. A written local quote is the authority, not this table.
Step 5: what it does. Going from R-19 to R-49 over 1,200 sq ft cuts the conductive heat loss through that ceiling by roughly 60 percent. Combined with air sealing, most homeowners in zone 4 see a real annual drop in heating and cooling, plus the thing they actually notice: the rooms upstairs stop being 6 degrees off from the thermostat. Your own saving depends on your fuel, your rates and how leaky the ceiling was, so read it off your utility bills a year either side rather than off a national average.
What Makes an Attic Insulation Quote Go Up
- Low roof pitch or a cramped attic. Under about 4 feet of headroom, everything takes longer and some crews add a difficulty charge.
- No walkable access. A tiny closet hatch instead of pull-down stairs means every bag gets handed up through a 22 by 30 inch hole.
- Removal of old insulation. Priced by the square foot, and on a big attic it can rival the new insulation.
- Knob-and-tube wiring. The electrical work has to happen first and it's a separate trade.
- Vermiculite. Testing, then licensed abatement if positive. This can exceed the cost of the insulation job several times over.
- Extensive air sealing. A house with many recessed cans, dropped soffits, and open chases takes a full day or more.
- Duct work in the attic. Crews have to work around it, and leaky ducts should be sealed while everything is exposed.
- High cost-of-living metros. Labor is priced locally, and it is most of the difference between the cheapest and the dearest quote you will get on the same attic.
Frequently Asked Questions
How much attic insulation do I need?
Match your DOE climate zone from the table above, which for most of the US means R-49 to R-60 total. Measure the depth of what's already there, multiply by the R per inch of that material, subtract from your target, and that's what you add. Your local code minimum may differ from the DOE recommendation, so check it.
Can I put new insulation over old insulation?
Yes, and it's usually the right call. Old insulation only needs to come out if it's wet, moldy, rodent-contaminated, or vermiculite. The one rule to follow: don't add a second vapor retarder. Use unfaced batts or blown loose fill over existing faced batts, never faced batts facing up.
Should I use batts or blown insulation in my attic?
Blown, for most attics. It flows into irregular spaces and around obstructions where batts leave gaps, it goes down faster over a large area, and it costs about the same. Batts make sense in a small, clean attic with uniform joist bays or when you want a first layer between joists before blowing over the top.
Do I really have to air seal before insulating?
Yes, if you want the insulation to perform. Insulation slows conducted heat, not moving air, and in an unsealed attic a large share of your heat loss is air moving through gaps. Air sealing is the cheapest part of the job by a wide margin and the only part you can't easily go back and do later, because the insulation will be on top of everything.
How deep should blown insulation be for R-49?
About 13 to 15 inches for cellulose and 18 to 22 inches for blown fiberglass, depending on the exact product. Check the coverage chart on the bag, since it lists the required depth for each R-value for that specific material. Install depth rulers before you start so you can verify as you go.
Will insulating the attic block my soffit vents?
It will if you don't install baffles. Baffles staple to the underside of the roof deck in each rafter bay and hold a 1 to 2 inch air channel open from the soffit past the insulation. Install them in every bay with a vent below it, before insulating, along with a dam at the eave so loose fill can't spill over the top plate.
What does attic insulation cost?
Installed work is priced per square foot of attic floor at your target R-value, with air sealing quoted separately. Doing it yourself with rented equipment costs a fraction of that, because you are buying only bags and baffles. To get a real number, measure the attic floor, pick your climate zone R-value, work out the bag count with our calculator, then send that same written scope to three local contractors and compare the air sealing line specifically.
When do I need to call a pro instead of doing this myself?
Call an electrician if you find knob-and-tube wiring, and don't insulate until it's replaced. Call a certified asbestos inspector if you find vermiculite, and stay out of the attic until it's tested. Hire out any spray foam work. And hire out the whole job if the attic has under 4 feet of headroom, no safe footing, or you can't wear a respirator comfortably for a few hours.
Related: Insulation calculator | R-value insulation chart | Types of insulation | Square footage calculator | Cost to finish a basement
Source for climate zone recommendations: US Department of Energy, Insulation.